Tuesday, 17 June 2025
Monday, 16 June 2025
Saturday, 7 June 2025
Friday, 6 June 2025
Sunday, 21 January 2024
How to Add or Remove a field in New or Edit form in SharePoint list

Follow the below steps to either add or remove a field from new item form or
edit form in SharePoint.

2. Click New to create new Item
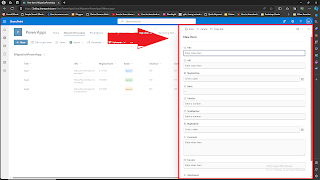


3. Click on the Dropdown and select Edit Columns

4. We see the columns that are available for this list

5. Un check the fields that are not required in the New or Edit form and click on Save at the top

6. The two fields that were un checked are gone now.

Similar way we can re add the fields. Here I have shown for new item form and same can be done in Edit form as well.
Happy Learning !!!
Learn it ! Love it ! Lead it !
To learn more just visit our page in Facebook SharePoint Dev
Thursday, 22 December 2016
How to make any field mandatory in Nintex form
Hi All,
To make any field mandatory in Nintex form is very simple and just follow the steps below.
Note: We can follow the same steps to make any field mandatory in Nintex task forms for example the comment box in the task form which we get in Assign a task action in Nintex workflow.
- Select the field which you want to be mandatory and click on it.
- Click Rules --> Add Rule from the ribbon
- Rule type --> Validation
- Type the following rule in the Rule box
- isNullOrEmpty({self})&&TaskOutcome=='No'
Note: Select isNullOrEmpty from the Run time functions.
Select self from Named Controls.
Type your outcome value inside Single quotations ('') (Here No is my outcome).
Task Outcome is the Field that I want to make it mandatory and I am making it as mandatory only if the approver selects the value "No" here.
Happy Learning !!!
Friday, 16 September 2016
jQuery Apostrophe alternative code
jQuery Apostrophe alternative code
Hi All
We use jQuery in SharePoint by adding the text file that contains the jQuery code into a Content editor web part.
We may want to use [ ' ] Apostrophe symbol in any of the field name that we fetch from SharePoint lists.
When we use the symbol directly in the code, the page will not get loaded and probably we will see an empty page without any styles.
To fix this error we just need to input an alternative alphanumeric text instead of the symbol.
Original symbol : '
Alternate text : '
Example :
The name we want with Apostrophe : S'ins
The alternate text that we should enter : S'ins
To fix this error we just need to input an alternative alphanumeric text instead of the symbol.
Original symbol : '
Alternate text : '
Example :
The name we want with Apostrophe : S'ins
The alternate text that we should enter : S'ins
Happy Learning !!!
Learn it ! Love it ! Lead it !
To learn more just visit our page in Facebook SharePoint Dev
Thursday, 7 January 2016
Lookup Column issue in Run If condition - Nintex workflow
Lookup Column issue in Run If condition - Nintex workflow
Hello everyone,
Sometimes there may be an issue in Nintex workflow, when you configure "Run If" action where you have to select a field that is Lookup column type we will face problems while saving the action or publishing the workflow.
The error:

Reason for this error is the lookup column that we selected. To get rid of this issue we need to include another action.
Before the Run if or any Conditional action, include "Set a workflow variable" action and create a workflow variable with text type. Use this variable in this action and assign the current item's lookup column value.
Using this variable, configure the Run if action or any other Conditional action and Publish the workflow. The workflow will be published without any error.
Happy learning and I hope this will help in a better way...
Keep learning ...
Learn it Love it Lead it !!!
To learn more just follow us on Facebook here Sharepoint Dev
Thursday, 31 December 2015
How to run a workflow for the entire list
Running a list workflow for the entire list
Hi everyone,
In my last post I explained how we can run a List workflow using a Site workflow. Now we will see how to run any list workflow for a list wothout using a site workflow.
Hi everyone,
In my last post I explained how we can run a List workflow using a Site workflow. Now we will see how to run any list workflow for a list wothout using a site workflow.
- Open the list Where you want to run the workflow
- Create a duplicate ( Test ) field - ex: Update ( Number type )
- Go to workflow settings and select only the workflow will start on modification and publish the workflow.
- Go to the list and change to " Quick Edit Mode "
- Go to the field which we created and type any number in the first column ( ex: 1 )
- Just drag that number down to all the list items and then the workflow will start for all the items simultaneously.
- If the number of items in that list is more, just change the items in a page to any number ( ex:1000 ) you want in the current view.
- Don't forget to delete the field which you created, once all the items are updated.
Happy learning guys !!!
Learn it ! Love it ! Lead it !
Our facebook page for more learning : Sharepoint Dev
Wednesday, 30 December 2015
How to run a Nintex workflow for a list
How to run a Nintex workflow for a complete list
Hi everyone ,
We often end up with a problem that we have to run a worklfow for the entire list or a library in sharepoint.
Sitting and editing the entire list is a breath taking work if the number of items in the list is more. We can follow a simple way to achieve it without much effort.
We just need to create a site workflow that starts the particular list workflow.
Steps are follows :
Hi
Hi everyone ,
We often end up with a problem that we have to run a worklfow for the entire list or a library in sharepoint.
Sitting and editing the entire list is a breath taking work if the number of items in the list is more. We can follow a simple way to achieve it without much effort.
We just need to create a site workflow that starts the particular list workflow.
Steps are follows :
- Create a "SITE" workflow.
- Insert "Query list" action.
- Create a collection variable ( ex: var_IDcoll ) to store all the ID s of the items in the list and create a number variable ( ex:var_currentID ) for single ID and select that variable in the output.
- Insert "For each" action.
- Use the second variable ( var_currentID ) in the for each action to loop through each items in the list.
- Insert "Call a web service" action.
- Use the following web service with the site URL. ( ex: https://sharepoint.com/sites/mySite/_vti_bin/NintexWorkflow/Workflow.asmx )
- Select the "StartWorkflowonListItem" method.
- Provide the List name and the List workflow name that you want to run for the entire list.
Just start the site workflow and it will start the list workflow for all the items.
Happy learning !!
Learn it Love it Lead it !!!
To learn more, just follow the page in Facebook Sharepoint Dev
Hi
Friday, 18 December 2015
Legend text length in Pie chart Using jQuery
Legend text length in Pie chart Using jQuery
Sometimes we may face a problem in displaying all types of
chart in a constant size due to number of characters in a legend name.One solution to this is to wrap the legend text.

How to wrap the legend text in chart using jquery?
Here is the code for that
Legend{
labelFormatter: function() {
var legendName = this.name;
if(legendName!=""){
var match = legendName.match(/.{1,15}/g);
return match.toString().replace(/\,/g,"<br/>");
}
}
According to the required length size of the legend text we can change the number like below.
var match =
legendName.match(/.{1,15}/g);
You can have any number of characters in a line which you specified next to 1 here in this code for ex:15.
Happy Learning !!!
Learn it ! Love it ! Lead it !
To learn more just like our page in facebook Sharepoint Dev
Thursday, 17 December 2015
Add Cancel Button to Info Path Form
Cancel button on Info path form
We often need to add a "Cancel" button at the end of our info path form and as a beginner we don't know how to do it.
Just follow the steps...
- Add a new button in your info path form where you want probably next to your "OK" button.
- Click on Properties in the ribbon of the Info path form designer.
- Click on "Add a rule"
- Select the follow -- When the button is clicked ==> "Close form"
A very simple way to achieve it.
I hope this helps in a better way !! Post your comments and queries ..
Thursday, 25 June 2015
Redirection To Site Using Query
Navigation to other page/site Using Content Editor
Hi Everyone,
Hi Everyone,
We came through some situations at where we need to Navigate the Users to the newly created page or site when they try to access the Old site.
There is an easy way to do it using the query. All you need to do it just follow the steps and get it done...
- Open the source site or open the page that you want to navigate.
- Edit the page.
- Add a content editor web part on the top og the page.
- Change the appearance Content Editor to "Redirect to ######"
- Make the Chrome type "None"
- Make the web part "Hidden"
- Click on "Apply" button.
- Now add the following query into the "Source Editor" button.
Query: <script type="text/javascript">
window.location.href = "TargetURL";
</script>
Once we done this, whenever any user goes to the page, they will be navigated to the Target URL.
Note: At any point of time If you want to stop this redirection just add "?CONTENTS=1" in the end of the source URL.
- All the contents of the page will be available.
- Select the particular web part.
- Delete the web part and it stops the navigation.
I hope this helps in a better way!
Friday, 8 August 2014
Global Node navigations
Adding Navigations using CSOM
We always have getting problem after our migration in our sharepoint sites from either 2007 to 2010 or 2007 to 2013. The normal problem we used to get is the quick launch links will not be changed and we will be forced to go and to site settings --> Navigation and editing manually.
By using client object model coding we can easily over come from this issue.All you need is to run the code in your visual studio and provide the site URL and the URL which you wanted to be changed.Here is the code we should run to get this done.
ClientContext ctx = new ClientContext("https://../sites/sitename");
ctx.Credentials = new NetworkCredential("UserName", "Password", "Domain");
NavigationNodeCollection collNavNode = ctx.Web.Navigation.QuickLaunch;
ctx.Load(collNavNode);
ctx.ExecuteQuery();
NavigationNodeCollection collChildNavNode = collNavNode[1].Children;
ctx.Load(collChildNavNode);
ctx.ExecuteQuery();
string linkURL = string.Empty;
foreach( NavigationNode item in collChildNavNode)
{
ctx.Load(item);
ctx.ExecuteQuery();
if (item.Url.Contains("https://../sites"))
{
linkURL = item.Url;
string url = linkURL.Replace("https://../sites", "/sites");
item.Url = url;
}
item.Update();
ctx.ExecuteQuery();
}
collNavNode[1] == Here the 1 represents the order . For example usually we have libraries in the top so that is in the 0 th location and if we want to change the quicklaunch for libraries you need to give 0 inside the bracket. When you debug this code using quick watch you can easily find the order of items.
I hope this helps in a better way!
Learn it Love it Lead it !!!
To learn more just like our page in facebook Sharepoint Dev
Subscribe to:
Comments (Atom)